gingery butternut squash soup


Four kinds of apples, two for eating and two for cooking.

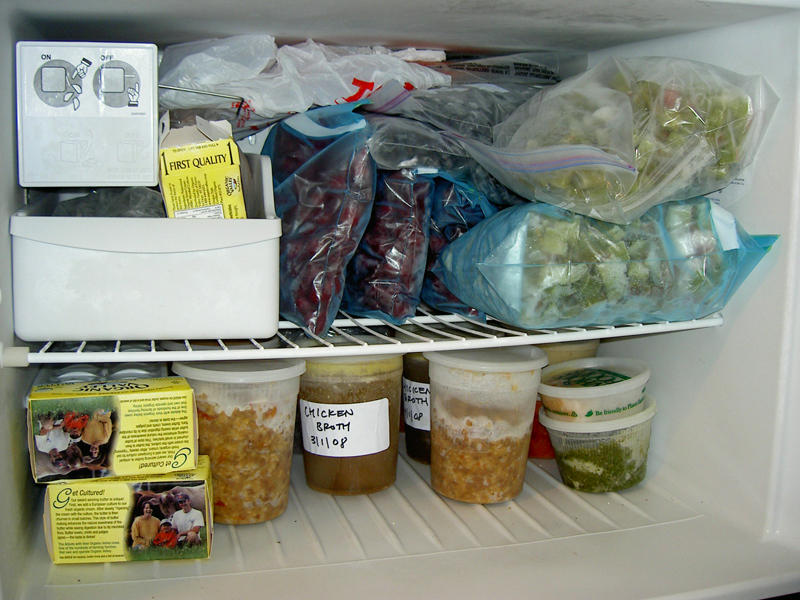
I am generally hard-pressed to choose a favorite aspect of autumn, but apples are very close to the top of the list. Each time I come home from the farmers’ market, I bring more apples with me. More types in greater volume on every trip. Today I went in search of apples for eating (my partner takes them in his lunch, and we have decided that local minimally-sprayed-and-delicious is better than shipped-from-another-continent-and-tasteless organic) and for cooking. The soup I was planning to make last week to use up some of the squash includes apples, and I’ve been waiting to get going on it since Thursday’s market was rained out. In addition to using one of the butternut squashes, it required the last of the fresh ginger from the container in the freezer and a container of broth, so I have been excited about it for many reasons. Yes, my college Tetris addiction is manifesting in an obsession with constantly rearranging the freezer to maximize space, I admit that.

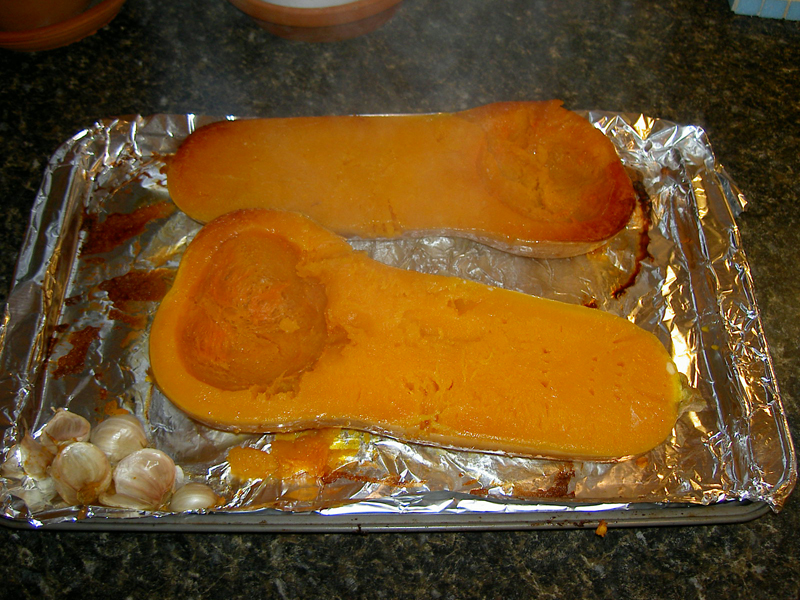
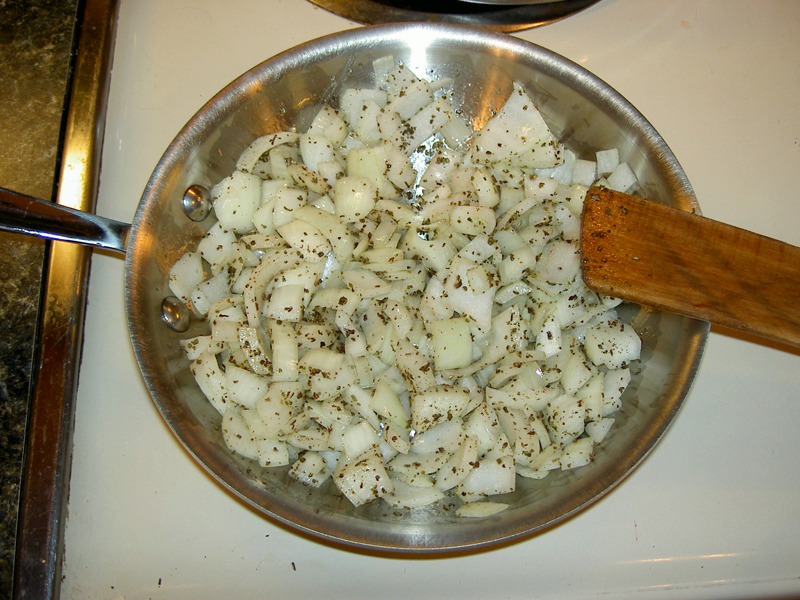
Today I made it to the afternoon market and collected more apples than I currently know what to do with, including the two I need for the soup. I’ll worry about the rest of the apples later. The soup is easy (again from Simply In Season): sauté two chopped onions and two tablespoons of minced fresh ginger in oil until the onions are translucent; add 1 chopped (peeled, deseeded) butternut squash, two chopped (peeled, cored) apples, and 4 cups of chicken or vegetable stock; bring to a boil and then simmer until the squash is tender.


Soup, in the beginning.

You are then directed to puree the soup, but I hate pureeing soups so I just usually mash everything in the pot with the potato masher instead. In fact, I don’t think I’ve ever used the masher to actually mash potatoes, only for soup, although a friend once used it to get holiday cookie frosting to the right consistency before I bought the hand mixer two years ago. Back to the soup: mashing works pretty well if you are not French and don’t mind having slightly lumpy soup (the onions don’t mash). You’ll also probably want to add salt, unless you put a lot of salt in your stock. I don’t include any, and I’ve had to add salt for taste to every recipe in this book that calls for stock, which makes me suspect they’re assuming salty broth.


Soup, at the end.

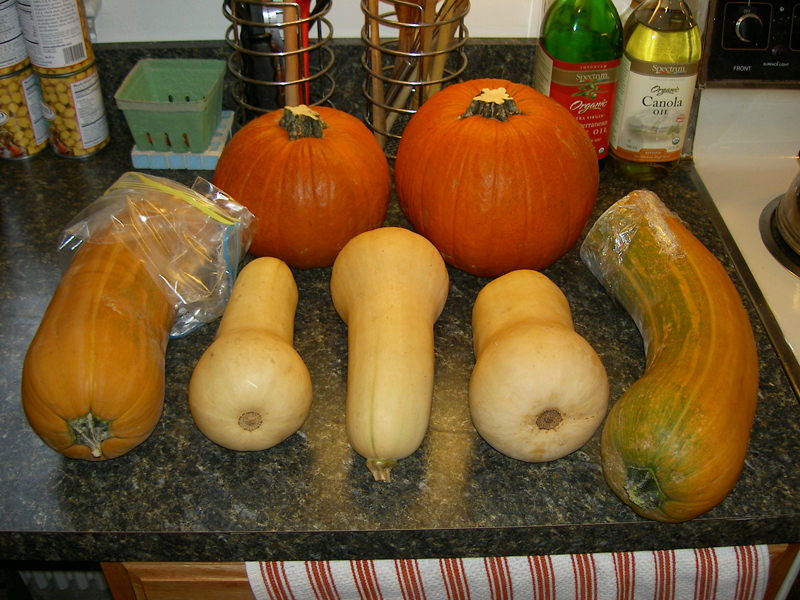
And there you have it: soup. This recipe would probably adapt fine to the stronger, less sweetly flavored courge longue de Nice, which is good because figuring out what to do with all that squash is next week’s task.

gingery butternut squash soup

winter squash bars


The freezer.

The major challenge I face with regard to processing and storing all the produce we receive with our farm share is the limited space in the freezer. We agreed to get a chest freezer this summer, but haven’t wanted to go ahead with that purchase until we get the basement repairs taken care of. Which leaves us with the fridge freezer, which is about half full of fruit from the summer (tart cherries, blueberries, and rhubarb) and 1/4 full of other prepared food (pesto, hummus, baba ghanouj, chicken stock, and tomato sauce). Which leaves about 1/4 of the freezer for regular things (butter, bread, coffee beans, salmon, and turkey burgers) and any additional prepared food I might try to fit in. You begin to see my problem, and this is after removing the bottle of gin with an inch at the bottom that my partner pointed out was occupying prime real estate in the door (‘Gin? What gin? I don’t have a bottle of gin in the freezer, what kind of alcoholic do you think I am, sheesh. Oh, that bottle of gin…’). I really should just drink that and be done with it.

One of the other containers taking up space in the freezer was a quart of cooked squash from last winter, most likely butternut. At any rate, 4 cups of squash. In order to make room in the freezer for the cooked pumpkin from this year that is destined to be pie in a few weeks, I thawed out the already-frozen squash and used it to make Winter Squash Bars:

Winter Squash Bars, from Simply in Season
(yields 24-32 bars)

Beat together in a mixing bowl:
2 cups winter squash (cooked, pureed)
1 1/2 cups sugar
3/4 cup oil
4 eggs
1 tsp. vanilla
1/2 tsp. salt

Combine separately and then mix into the wet ingredients:
1 cup white flour
1 cup whole wheat flour
2 tsp. baking powder
1 tsp. baking soda
1 tsp. ground cinnamon

Pour into lightly greased 11 x 17” jelly roll pan. Bake in preheated oven at 350F for 25-30 minutes.

As with just about every recipe I’ve made from Simply In Season, the bars were really good. In addition to using up squash, they use up eggs, 4 per batch (so if you also have more eggs than you know what to do with from, for example, your CSA, this recipe will help get rid of them). More like gingerbread than cookie bars, they were a hit with everyone: me, my partner, my friend from high school, her mother, my partner’s gaming guys. Four cups made two batches, about 5 dozen bars in all. While they still tasted good after being stored in tupperware overnight, the tops went from a nice bright orange to a bit brown; don’t be put off by that if it happens to you.

The next squash plan is soup, if I can (1) get some apples at the farmers’ market and (2) make some room in the freezer.

winter squash bars

butternut squash galette


Squash!

This summer we received a lot of squash from our farm share, and I do mean that nearly literally. Four butternut squashes and about that much again of an enormous squash called courge longue de Nice, which I had neither heard of nor seen before joining our CSA. In addition to this bounty, I picked up a couple of small pie pumpkins when they appeared at the market last week, as I’ll be bringing pies to our friends’ Thanksgiving dinner this year. When we received the first hunk of courge longue — a squash so big that only a piece of it nearly filled our weekly box — I cubed it, tossed the pieces with olive oil, minced garlic, salt, and pepper and then roasted it into submission until it was soft and sweet. I confess that I tried this approach last year and didn’t peel it or cook it long enough and it was bitter; as a result I let one of last year’s lovely huge specimens go to waste, a loss I am trying to avoid this year.

At any rate, we ate an entire dinner of squash (pretty much) and it didn’t seem to make any kind of dent in the stores. Which is good in the return on investment framework and not as good for the hope of ever eating anything other than squash again. With this in mind, I set out to discover what else I could make from our squash. For last night’s dinner (and today’s lunch) I chose the Winter Squash Galette recipe from Vegetarian Cooking for Everyone. I knew from my experience in the spring that I was capable of making a galette, and I happened to have everything in the recipe already in the house, which is less common than I would like when I’m trying to use Deborah Madison’s recipes. In only a few easy (but somewhat time-consuming) steps, we had dinner.

Step one: halve and deseed the squash, brush it in olive oil, stick a head’s worth of cloves of garlic (separated but not peeled) into one of the cavities, and bake facedown on a cookie sheet at 375F for about 40-50 minutes (my large squash took 50, the recipe says 40, the main thing is that the squash be tender when it comes out):

The squash cooling before being mashed up.

Step two: sauté one chopped onion in a skillet with 1 tbsp olive oil and 2 tsp dried sage (or 2 tbsp chopped fresh) for about 12 minutes until onions are soft and have changed color:

Delicious smelling onions.

Step three: mash up the squash, squeeze the soft garlic cloves out of their husks and mix it in, mix in the onions, and mix in 1/2 cup of grated parmesan or pecorino cheese (I used pecorino, because that’s what I happened to have bought on a whim on my most recent trip to the store):

Cheese! In a bowl from the White Dog Café!

Step four: let the filling cool, salt and pepper to taste, make one big galette or several personal galettes with the dough that you made already and rolled out and has been chillin in the fridge, and bake on a cookie sheet for 25 minutes at 375F (if you are making small ones, they can go on a sheet with an edge as they can be lifted out with a spatula; for a single large one I recommend no edge and sliding them off onto a wire rack pronto while they are still very hot and before the butter cools and makes the galette stick to the sheet). [Aside: I was unable to get a good photo of the finished product, so that will have to wait until the next time I make these.]

If you aren’t going to eat the whole recipe at once, Madison recommends that you store the extra dough and the filling separately and bake the galettes up fresh, and I concur. We made two more today for lunch, and I used the last piece of dough (somehow I was able to divide more evenly by five than six) to make a galette with some of last winter’s membrillo that we still have in the fridge. I haven’t had a jam tart in a very long time, and I have to say that this version was delicious. I highly recommend what I have been known to refer to as ‘sugar pie’ to everyone.

butternut squash galette

tomato season


About half the tomatoes we received from the folks we know in Frederick.

This summer we expected to have three sources of tomatoes: our farm share; our own plants; and my partner’s boss, who brings surplus vegetables from his home garden into the office. As expected, we did receive quite a few from the farm share, which I ate sliced onto sandwiches if they were big and my partner took as part of his lunch if they were small. Sadly, our homemade boxes did not really work out. I suspect that we both overwatered and overfertilized them, as the plants turned pretty much completely brown. We ended up getting about a half dozen cherry tomatoes and four regular ones from the seven plants, with a very daring squirrel making off with most of the green tomatoes as they reached a goodly size. We may try again next year, but it’s more likely that we’ll dig a garden into the ground either next summer or in two years, whenever the major work on the foundation and in the yard is completed.

By far the most prolific source of tomatoes, though, was my partner’s boss. He and his spouse have an enormous home garden that includes 40 tomato plants of 25 varieties, and that’s simply more than they’re able to eat and process. We were invited up to the house to see the property and have dinner; they built a house on former farmland that is now wooded and zoned for conservation. After a very nice evening walking in the woods, harvesting in the garden, and sharing a meal, we were sent home with a trunk full of mason jars — this was part of the plan, as they had acquired many more than they now need over the years and were looking to donate them to someone just starting out with canning, which would be me — and a back seat full of beautifully hued heirloom tomatoes. When we got home, I sorted them into baskets by type and promptly gave away about a third of them to neighbors and friends, discovering in the process that heirloom tomatoes are a perfectly valid and welcome contribution to a summer potluck. Even with eating the cherry tomatoes like they were candy, we were still left with about a dozen quarts of tomatoes of varies shapes, sizes, and flavors, which required me to get creative.


Chopped up and headed into sauce.


Chopped up and headed into turkey lentil pilaf.

The first thing I did with the tomatoes was stew them up with onions and the spicy peppers we received from our farm share into a sauce that I served over cornbread. I use the cornbread recipe from Sundays at Moosewood Restaurant, substituting just about everything: I like the recipe because it remains delicious with rice milk, whole wheat flour and egg beaters. We had that meal for a couple of nights, I put three containers of sauce in the freezer, and we were still looking for something to do with the rest of the tomatoes. I turned at that point to my new favorite cookbook, Simply In Season and hit upon turkey lentil pilaf. This recipe not only used a bunch of fresh tomatoes, but had the added advantage of using the two packages of ground turkey that had been in the freezer for nearly a year. It also used up a of couple of containers of chicken broth that I made last winter from the farm share’s stewing chicken and some of the lentils and some of the stockpile of lentils and rice, so it was a good eating-from-the-stores recipe all around. Between making that twice, eating sliced or cherry tomatoes as snacks, and mixing up a couple of large batches of cucumber-tomato-mint salad, we managed to make our way through the tomatoes in about two weeks.

Of course, our farm share tomatoes kept coming: I have about a quart in the kitchen right now and will pick up more tomorrow. The ones in the yard, we decided to just leave for the squirrels.

tomato season

summer of pie


My first cherry pie.

This summer has been full of pies, and I expect I’m not quite done yet as I’ve promised a friend a peach pie for her September birthday. The peach pie will be the sixth pie of the summer, and I think that’s a nice round number. I’m sure there will be apple pies and sweet potato pies and the like in autumn, but we’ll take those when they come.

To kick off the pie making, we celebrated the 4th of July by having dinner with the family of my good friend from college, to which my contribution was a cherry pie. I had planned to make a peach pie, knowing that was a favorite of our host, but the folks at the fruit stand assured me that the only local peaches good for pie-making didn’t ripen until later in the summer. Despite my best efforts to seek assurances that the peaches they sold for eating fresh would be fine in pies, they held steady and advised me to go with their fresh tart cherries. I wasn’t a hard sell; cherry pie is my favorite. Knowing that tart fresh cherries are hard to find and wouldn’t be available long, I took the plunge and snapped up ten quarts, enough for five pies. Two of those quarts I made into a delicious pie, and eight of those quarts I pitted and froze for use later in the year.

Despite what we might assume about pie, it wasn’t a given that the cherry pie would be delicious. Mostly because I have been experimenting with whole wheat crusts and wasn’t entirely sure how that was going to turn out. Using the newly widely available Organic White Whole Wheat flour from King Arthur, I can say that their ‘just like white flour but brown!’ advertising is truthful. Unlike with traditional whole wheat flour, the white whole wheat flour performs pretty much the same in recipes; it has a subtly different taste, but it’s not as grainy or flat as replacement with traditional whole wheat flour tends to be. It’s more brown, which bothers some people but I personally like. I’ve also discovered that the crust recipe I use is perfectly suited for assembly in a food processor, which boosts the performance of the wheat flour as the dough is only minimally handled. The other factor in the cherry pie, which wasn’t likely to impact the taste, was the lattice top, another first for me. I went, shall we say, rustic with it: I made the strips of dough wider and included fewer of them, making the whole lattice assembly go more quickly and easily. In the end, of course, it was a delicious homemade cherry pie and nobody noticed any of the things I’d worried about (the above plus my concern that there was more juice than there should have been in the filling and my overcompensating by adding in some tapioca).

Following the cherry pie success, I made an apricot-ginger pie just because the fruit folks had fresh apricots that reminded me of the tree my grandparents used to have at the side of their house. That pie was ok — it was a homemade pie — but I wouldn’t go out of my way to buy apricots again in the future. If I had a tree in my yard, the pie would be a perfectly reasonable way of using them if I weren’t planning to spend hours making jam. Since I don’t, it was a good experiment that I fed mostly to my partner’s weekly gaming crew.

After a lull in pie-making during which we traveled around and recovered from being ill, I made three blueberry pies in the course of a couple of weeks. In the past I’ve been loathe to use the fresh blueberries for pies, but by the time they make it back to our fridge the oldest ones are invariably starting to wilt a bit, making them ideal for baking. Blueberry pies are always an appreciated contribution to a dinner with friends, which was the destiny of two of the pies, and a handy way to welcome new neighbors, which was the destiny of a portion of the third pie. Not all pies get more tasty after a day in the fridge, but I find that my favorites typically do: cherry, apple and blueberry (now you know).

In the course of all this pie-making and transporting, I had the opportunity to use my handy pie carrier — for which I was heartily mocked last year when I purchased it, I must say, the phrase of choice being something like ‘how often are you taking a pie somewhere really?’ I still think it’s one of the best investments of $8 I’ve made for the house, and have found that almost every time I make a pie it’s headed to someone else’s house. I was, though, disappointed to discover that the crust guard I received as a gift a couple of years ago doesn’t fit on my large pie plates, but I’m hopeful that it will still fit on the smaller metal one. And, I can continue to heartily recommend the Williams-Sonoma Pie and Tart cookbook, as the blueberry and apricot-ginger recipes came from them (the cherry pie recipe did not, but instead from Bon Appétit via the internet, as the Williams-Sonoma recipe called for canned cherries).


Pie never lasts long at our house.

summer of pie