food : autumn canning


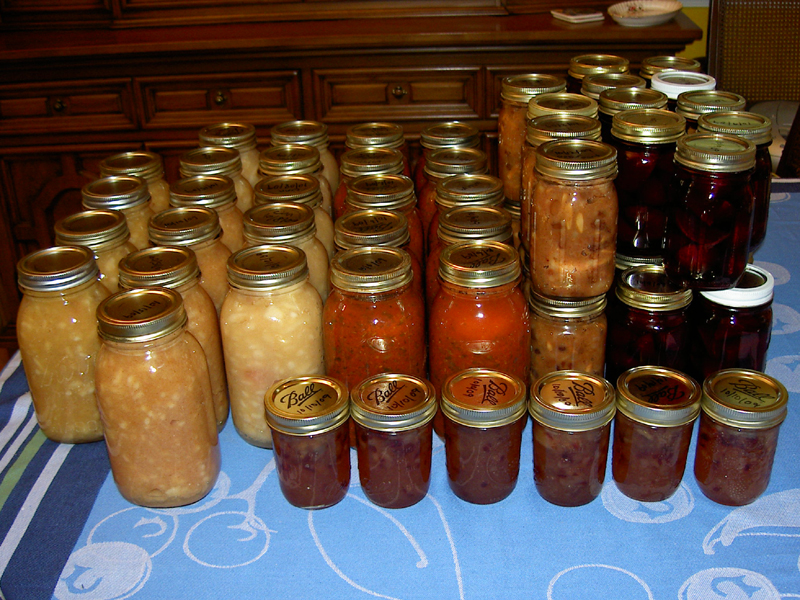
Applesauce, tomato sauce, pear mincemeat, and pickled beets, with spiced pear jam in front.

A couple of weeks ago, we spent an afternoon at Larriland Farm, where we picked our own bags of Stayman apples (48 pounds), beets (20 pounds), and Roma tomatoes (30 pounds). I also bought three smallish pie pumpkins and a box of pear seconds. This last was from Catoctin Mountain Orchard, where we’d hoped to pick apples and were disappointed to discover they were only sold pre-picked from the store (thus the trip over to Larriland). My plan was to turn all of this into canned goods, that we’d eat through the winter while marveling at my foresight and dedication to our tastebuds. Okay, maybe not the last bit, but making the food last a good long time was definitely the plan.

The first day, I made tomato sauce from Barbara Kingsolver’s recipe from Animal, Vegetable, Miracle. The sauce was tasty (we had enough left over for a meal that night), and I have 10 quarts of it to look forward to eating over the next year. I have 10 quarts of it because…well, because the 30 pounds of mostly Roma tomatoes I picked were apparently much denser than the 30 pounds of tomatoes she calls for in her recipe. So I had two big pots of sauce simmering down, which were then combined into one big pot, which was then augmented with another 1/2 recipe of spices, and finally simmered down to 10 quarts. It’s not only that my 30 pounds was more voluminous than her 30 pounds, it was also that I puréed the tomatoes by putting them fresh into a food processor, not by cooking them and straining them and then putting them into a food processor. So whatever liquid was in the tomatoes was in the pot waiting to be cooked off. Nothing I’ve read says that the way I did it was wrong, and I still had a half recipe more than projected, so I’m thinking the larger factor was having all Roma tomatoes. At any rate, come on over for pasta!

After the tomatoes were dealt with, I proceeded on to beets. Over the course of the next three days, the 20 pounds of beets became 19 pints of pickled beets (technically 21 pints, as two went into the fridge and we ate it right away). While this works out to about one pound per pint, the recipe was in cups of sliced beets so it was a bit…exciting…to figure out how many were needed for each batch. In the end, I just boiled pots of beets, skinned them in cool water (much easier than peaches, or tomatoes for that matter), and stored them in the fridge until they could be sliced and pickled in 10 cup increments. I used the Ball Complete Book of Home Preserving recipe, and had to double the amount of liquid to fill the five pint jars per batch. (I found that if I stored the extra beets and liquid from the first batch, and added them to the pot at the end of the second batch, two batches made 11 pints.) Don’t ask me why; maybe my pot had too much surface area, maybe I boiled it too vigorously for too long. Whatever the reason, I needed more liquid (which is how we ended up with 2 pints in the fridge in the first round). Before I started I considered making a variety of flavors of pickled beets, but in the end I stuck with the regular kind, figuring that everyone knows and likes the familiar taste so why mess around with it. So, come on over for pickled beets!

The other major effort was turning the apples into applesauce. These Stayman weren’t particularly great, sort of mushy and not as tart as I remember from previous years, so my plan was to combine them with a few Empire apples (from my market friends at Harris Orchards) and make them all into sauce. About 12 pounds of apples goes into four quarts, and with the combination of the two kinds I had plenty for four batches with some left over. I started off following the Ball recipe, but quickly abandoned it as it uses far more sugar than I like. (It also calls for a tablespoon of lemon juice for each quart; I forgot to add it for one batch, which led us to do some research and learn that the USDA does not require lemon juice for canning apples, as all apples on the market are acidic enough to safely can using the water bath method. I still added the lemon juice to the last batch, but don’t worry if the recipe you have doesn’t include it or you forget.) The first batch I made with half the amount of sugar and some cinnamon, and it came out way too sweet (I’m sure my partner will slurp it up like the candy it is). The second batch I made with only 1/2 cup of sugar, the way I like it, and the third I made with more cinnamon (2 teaspoons) and 1 cup of sugar (which still made it a very sweet dessert sauce). The last batch was back to the 1/2 cup, and the apples were old enough by that point that even the added lemon juice couldn’t keep them from browning up quickly. It still tastes fine, but doesn’t look as nice in the jar (which destines it for early consumption). Now that the sauce is out of the way, I’m looking forward to another round of tart apples (such as Granny Smith and Braeburn) to make into other things, like chutney and mincemeat.

Speaking of mincemeat, that’s what I made from the pears. Two kinds of mincemeat (one with rum and currants, and one with port and regular raisins) both from the Ball book. The pears were overripe and very juicy, so I’m not sure that the consistency is quite right on the mincemeat, but they both tasted delicious (if a bit overly sweet; for a person with a sweet tooth, I seem to be at the low-sugar end of the range). I’m sure they’ll be a hit at Christmas, and their beef-free status makes them worth their weight in dried fruit. These two recipes were also by volume (10 cups of chopped pears each) rather than weight, and I neglected to weigh the fruit ahead of time, so I don’t actually know what we acquired for our six dollars. Enough to make 8 pints of mincemeat and another 7 half-pints of jam. The jam was the first attempt at using pectin, and I have mixed feelings about it. On the one hand, the jam gelled up beautifully. On the other hand, the jam seems cloyingly sweet to me, although that’s somewhat cut when it’s actually on toast and not just being taste-tested from a spoon. It’s a nice recipe, though, with cinnamon and dried cranberries for a bit of a spicy-tart undercurrent. Of course, as soon as I’d used all the pears this way, a friend pointed out that Elise put up a pear butter recipe at Simply Recipes, so I’m tempted to get another box of pears and make pear butter next week. The downside is that it involves cooking the pears then putting them through the food mill, a process that I generally dislike. The upside is that it looks delicious!

Now, I just need to cook, purée, and freeze the pie pumpkins and the kitchen dining room will be cleared and ready for the next round of apples. Just as soon as I find a place to store all the filled jars.

food : autumn canning

food : tomatoes

A couple of things have contributed to my silence around here the past couple of weeks. One, it’s been godawful hot and sitting in front of our furnace of a computer is the last thing I want to be doing. Plus, the heat makes my brain melt so anything that requires stringing words together coherently is out. Two, we’ve been up to our eyeballs in fruits and vegetables, and it seems like I’ve been working around the clock to chop, peel, dice, slice, bake, roast, stew, and generally turn them into meals. It probably hasn’t been around the clock, it just seems that way because the kitchen gets so hot.

This year has not been great for tomatoes in our area, so we didn’t get as many early in the season as we usually do. In the past, we’ve been heartily sick of tomatoes by this point in the summer, and this year we’re just getting going. I’ve had sliced Purple Cherokee tomatoes on fried egg sandwiches and my partner’s been taking the assortment of cherry tomatoes to work with his lunch. That leaves us with several pints per week from our CSA (now quarts as the harvest picks up) of mid-sized red, orange, and yellow tomatoes to deal with, in addition to whatever odds and ends are given to us by our friends with the enormous garden. Two weeks ago the solution was deer chili. Yes, I said deer chili. I know that you couldn’t pay me to eat a venison burger during the nine years I lived in a deer-shooting-friendly state, but now that I’m a grown-up and the deer is free and leaner than beef, I’ve succumbed. It’s actually not that bad, and works really well in the recipes in which I’d previously used ground turkey. So, yeah, I’m not a vegetarian anymore, but that still doesn’t mean I’ll eat any of the meat that is reasonably easy to procure and cheap by way of coming from a CAFO. Mennonite-raised chickens and turkeys, wild salmon, and deer killed by a friend: that’s about the whole of it. I may branch out to Mennonite-raised pigs for the holidays this year; don’t hold your breath, though.

At any rate, the chili was good and used up a lot of tomatoes. We have another 2 lb. package of ground venison, but since we also have 2 containers of chili in the freezer, I probably won’t make another batch just yet. Last week I made ratatouille for the first time in order to use up some tomatoes and one of the two eggplants we had in the fridge. While I ate ratatouille growing up, I never buy eggplants of my own volition because I don’t really like them. Since subscribing to our summer CSA, I’ve had to adapt to receiving them as one of the semi-regular vegetables. The first year, I made all of the eggplant into baba ghanoush. Which worked out well, because many of our friends liked it so I could serve it to guests and didn’t have to really eat that much of the eggplant at all. Last year, the weather wasn’t great for eggplants and we didn’t get many (or, possibly, our farmer scaled back because we received so many the year before). This year has been a low-eggplant year, but in CSA terms that means I’ve only gotten a few of the Japanese eggplants and 2 decent sized standard ones. Thus, ratatouille, using the Simply In Season recipe. It was good, and my partner liked it well enough for us to allow for a repeat later this week. I did have to go out and purchase the courge, which I found kind of amusing. Our farmer is committed to not overwhelming us with the vegetable that everyone else is typically overwhelmed with in the summer, thus the summer squash shortage.

Winter squash, however, is a different story. We are already starting to see the boom of winter squash, and I had two spaghetti squashes (one enormous, one normal) to find a use for. I’ve seen those weight loss shows, I know that you can do some weird thing and the squash gets all stringy and you can eat it with sauce if you’re on the Atkins Diet. I just really didn’t know what weird thing, or if this was a food that a person not trying to lose 10 pounds per week would ever want to actually put in their mouths. Since we had the squash we gave it a try, serving the ratatouille over it, and I am pleased to report that it was good. The other half of the (enormous) squash I used to make a cold salad with chunked fresh tomatoes (also chopped onion, minced garlic, and fresh basil). The salad was surprisingly good. I am not the best at cold salads; it rarely occurs to me to make them and I am always doubtful regarding their appeal. Last summer was the first year I made a cold salad other than bean or potato (and I haven’t made potato salad in years), a shredded beet salad from a recipe foisted on me at the farmers’ market by the guy who runs the nearby community garden farm. This year I tried a couple new combinations, and they were all nice so I shouldn’t really have been that surprised that a non-green salad was good. So good that we voted to use the remaining squash for another salad rather than with the ratatouille, even.

In addition to tomatoes, which another round of salad has the benefit of making a dent in, the item I most need to find a use for is chicken stock. Our winter CSA included two stewing chickens, and due to limited time I only ever stewed one of the chickens. (Yes, I don’t have a job, but that doesn’t mean I actually have a lot of time for all-day activities like making chicken stock.) Now, limited freezer space means that I need to use the chicken stock I have before I can thaw and stew the remaining chicken. One of the only recipes that I make regularly with chicken stock—Turkey Lentil Pilaf, also from Simply In Season—also uses up fresh tomatoes, so we’ll be having that tonight and probably a couple more times over the next few weeks. In fact, the recipe doesn’t use much more than chicken stock and tomatoes: lentils, turkey, rice, and fresh mint. Probably also some onion and garlic. Now you know.

After tonight’s pilaf and tomorrow’s ratatouille, I’ll assess the remaining tomatoes and decide if some of them need to be stewed and frozen. And then we’ll pick up our CSA on Thursday and start all over again.

food : tomatoes

garden : yellow jacket ground nest

As a general rule, I don’t like to spread poisons around. Not inside the house, not on the lawn, not to kill bugs, and not on any of the plants I’ve planted. There are, of course, exceptions. For the first couple of years we lived here, we sprayed poison in a perimeter around the foundation of the house to discourage the ants that had decided the interior was better than the exterior during the year in which the house stood empty. The past two springs we’ve sprayed the cherry trees with larvacide to prevent Eastern Tent Caterpillars from recurring to the extent they did the year I drowned 2000+ by hand (from which I still haven’t truly recovered). I spray the poison ivy with the strongest poisons I can find whenever it crops up, for what little good it does me. And, this year I spot-sprayed ‘insecticidal soap suitable for organic gardeners’ on the bee balm and hostas that were becoming totally covered in little midges and white flies and aphids and what have you. Most of the time, though, I rely on nature to balance itself out (although reading that tally does give the impression of quite a lot of poisoning).

When it comes to wasps, I generally try to keep an eye out for their nests and knock them off the porch ceiling with a broom handle before they get too large. This year, however, yellow jackets made a ground nest at the edge of the lawn. I discovered this in the same way that everyone discovers yellow jacket ground nests, by getting stung on the ankle while mowing the grass. Besides pissing me off and making my ankle swell up like a red-hot baseball for a couple of days, this was disturbing because it’s right in the clumps of weeds that I typically yank up by hand whenever I get the chance. After consulting with our town public works manager, I conceded that the best thing to do was mark the spot and have my partner spray a can of Raid ™ into the hole in the middle of the night. It took us some time to locate the opening; for a while I was thinking we would have to weed-whack the area and run, but some careful observation eventually revealed the spot from which they were coming and going.

Last night after dark we did the deed, nobody got stung, and this morning I didn’t see any wasps coming or going. I can’t say that I’m totally pleased to have emptied a can of toxic chemicals into the ground, but I’ll certainly feel better about the whole thing if it actually works.

garden : yellow jacket ground nest

garden : rain barrel


Freshly installed rain barrel, with rhododendron.

I have two overarching goals with regard to our house: (1) to make the entire enterprise of living here more energy efficient and (2) to make the yard and garden more pleasant and usable. Rain barrels address both of these aims to a certain degree, by reducing the amount of water used outside and taking away a favorite breeding ground for the nasty little daytime mosquitoes that proliferate in our town. While the rain barrel has an overflow tube, the tube can more readily be screened to prevent mosquitoes from breeding in the tube, since the water in the barrel is screened at the entry point.

I had been thinking about rain barrels for some time when I read about a local workshop in Organic Gardening magazine (something I probably never would have looked at but have greatly enjoyed since receiving a subscription with our composter). The workshop took place at the Accokeek Foundation, and was a collaboration with the Interstate Commission on the Potomac River Basin (ICPRB). ICPRB has commissioned Rain Bear Rain Barrels, which are well-suited to the hot mosquito-heaven that is our area during the summer; I thought we’d be making the barrels ourselves, but then learned that they are pre-assembled by volunteers onsite at the Accokeek Foundation. The workshop was more informative that hands-on, designed to make sure that we all knew how to install the barrels safely in order to not have them drown a raccoon or fall on a child. Once we’d gotten the information and signed a liability waiver (‘I will not sue you if my rain barrel drowns a raccoon or falls on a child’) we were free to go. A very nice man who lives two towns over from ours loaded one of my barrels into the back of his ginormovan SUV and dropped it off at our house after it was a surprise only to me that just one of the 60-gallon barrels would fit in our Saturn (now is the time when you’re impressed that any 60-gallon barrel would fit in our Saturn).

Once we got the barrels home, they stayed in the backyard against the house (upside down) for a month. Mostly because we hadn’t decided what modifications we’d make to the downspout and partly because I wasn’t that confident in my ability to level the ground. Even though I intellectually understand that paying the bank an obscene amount of money every month means that we can do whatever we like here, including lopping off the downspouts, I have a pretty large barrier to undertaking new projects of that sort. In the end, we decided to create a replacement short downspout that could be swapped out in the winter, thus avoiding having any flexible tubing that invariably turns into a mosquito Club Med. In the end, I mostly supervised and my partner did all the work of leveling, cinder block carrying and arranging, downspout cutting and reassembling, and barrel placement. It took us two days with the heat, some order of operations errors, and the fact that it was going to rain that night so it couldn’t stay half-assembled. In the course of getting the space ready, we had to cut the rhododendron back a bit; we dug up some of the rooted branch and passed along the section to a friend who was looking for something to replace an azalea that had died. By the time we got the segment into and out of the car again, it looked much scruffier than it had when we started digging it out. So far it’s survived, though, and we’re hoping that with some TLC and rain it will bush out and look like an actual plant.

The night we finished assembling the barrel—singular, as we still need to scrounge up some more cinder blocks and clear out some underbrush to create a space for the second barrel on the other side of the addition, a task delayed by having two wedding things, a pool party, and a 40th birthday party to attend last weekend—it poured rain. We ran outside to check on our barrel, all excited, only to discover that my partner had assembled the pieces of the spout inside-out and water was gushing out at each of the seams. So, in the middle of a lightning storm, he stood on a metal railing and dismantled the metal downspout, using metal pliers to reshape the pieces and make them fit back together the other way. After which our barrel filled up in about 39 seconds flat, and we were able to determine that yes, the overflow tube works just as it’s meant to. Since then, I’ve used the water for the ficus trees that are now out on the porch and some of the indoor plants; I need to get a watering can with a more narrow spout if I’m going to water the indoor plants from the barrel and not have to make a million trips out to the backyard with the plastic cups I typically use. Already I’ve noticed a marked downturn in the numbers of daytime mosquitoes on that side of the house and the water comes out as cool as promised.

I don’t know how many barrels we’ll end up with, although I did have this vision of a barrel at every downspout (which would probably not look the best at the front of our historic brick house, so is unlikely to happen). The barrels are $90 each, which is about half as much as those I found online, but if you’re buying more than a few it’s more economical to get a 400 gallon tank-style barrel. I’m not sure we have either the space or the watering needs for the larger barrel, so I keep reminding myself that the goal is not to collect every drop of water possible from our roof, but is instead to replace the tap water that I’d be using anyway. That isn’t actually a lot, as I don’t typically water my garden after the plants are established (the water is not recommended for car-washing, as it collects small grit from the roof and gutters). Having 120 gallons on hand at any given time seems pretty sufficient for our purposes, and we’ll just need to keep working on managing the water deluges in other ways.

garden : rain barrel

home : green living room

Our big accomplishment at the end of May was painting the living room. The living room was the last large room on the list to be painted; we’ve already completed the dining room, family room, and bedroom, as well as two of the three bathrooms. What can I say, after decades of living in whitewashed rentals I wanted some color on the walls! We left the living room for last partly in the hope that our painting skills would improve on some of the less central rooms (which they did) and also because we had no idea what we were going to do with all the stuff that is in the living room while we painted it. In the end, we moved the sofa and freestanding bookshelf into the dining room and piled everything else in the center of the room. This left not very much space to get around, which meant that my partner did all the actual painting in the end. Usually he edges and I roll, but he deserves all the credit for this one.


The living room in the process of being painted.


Living room, out the front window.


Living room, from the doorway toward the far exterior corner.


Living room, from the doorway toward the far interior corner.

Eventually, we’ll have actual chairs to replace the porch chairs (I’m holding out for something like these), a non-green rug, and some lavender pillows. You know, when I win the lottery.

home : green living room